Do-it-Yourself Garage Door
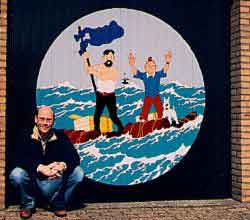
In August 1998 I had the idea to decorate my garage door. The door needed painting after all. I only had to find a good design. As a Tintin-lover it wasn?t that difficult to find a good subject. I decided on The Red Sea Sharks... with my own touch.
On the original book cover, there were three men on the raft: Tintin, Haddock and Skut, the Estonian pilot. However, for my garage door, I only wanted to have Tintin and Haddock, because they are the central characters recognisable to most people.
When I made the design, I got really enthusiastic and wanted to finish the project as soon as possible. But, life was never meant to be easy. I had a slight problem: rain.
What awful summer weather we had in Holland last August! The project took me almost an entire month to complete. Everyday returning home from work, I would take up my paintbrush and start painting between the raindrops. The saddest moments were the wasted weekends when I had all the time in the world to paint, but the weather just wouldn?t allow me to.
Step 1: Tracing the original
Take an A4 sheet of tracing paper and trace the contours and lines into an outline. If you want to make any adjustments like I did, leaving out the 3rd person and replace it for some extra sea, do so now.
Download Tintin garage door design outline [163KB ZIP].
Step 2: Scan the tracing with a flatbed scanner
Take the outline transparent you made in Step 1 and scan it on your flatbed scanner. Do it in a high DPI, for example 300 DPI.
Step 3: Fill in the colours
Take your favourite drawing program, for instance Paint Shop Pro, open the picture you have just made in Step 2. Reduce the number of colours to 256. The number of colours I used was about 13. Now fill in the colours you like, or the colours that best match the original colours. Once you're ready, print the picture, and put it in a plastic sleeve. You?ll need it for later when painting the door as your home-made original.
Step 4: Make a colour scheme
Now count the number of unique colours of your original picture and make an equal number of rectangles of about 2x4 cm on a new picture. Fill the rectangles with the same colours you made for your original picture. Print this picture too. You'll need it in Step 5.
Step 5: Get the paint from your local hardware store
Take the grid with the coloured rectangles and go to your local hardware store. The paint shop will stock some brands of paint, which will either match, or closely match your colours. Maybe you'll have to let the paint shop mix some of the colours you need.
Ok, this might be a bit of a disappointment: my local paint shop only mixes 0.5L cans. Now, 0.5L is more than you will need for 10 garage doors!! The colours that I needed most were: white, cyan for the sea and blue for the sky. I bought 250 ml of cans with standard colours and even that was way too much. I ended up only using between 50 to 100 ml per colour.
WARNING:Use only paints on turpentine base. Do not use turpentine-based paints and mix it with car paint or paints of other sorts, it will ruin your precious work!
Do not forget to buy transparent lacquer, too, for the finishing layer to protect your work against sunlight and so on.
Use transparent lacquer for metal (not wood)! 250 ml will be sufficient for coating the entire garage door once.
Step 6: Make a transparent foil for the overhead projector
Take the outline drawing you made in Step 1 and take it to a Xerox/copying machine. Make a copy to an overhead transparency sheet.
Step 7: Arrange for an overhead projector
After the garage door is sand-papered and painted with a (light coloured) primer, it?s time to take the overhead-projector and wait until it's dark outside. Now the fun begins.
Project your transparent copy on the garage door. Make sure the image is in the middle and perpendicularly projected. Now trace the projected outlines with a permanent marker, such as an Edding 3000, which is water-resistant. This is vitally important, because we do not want our outlines washed out with the next shower, do we?
Step 8: Fill the outlines on the garage door
Now it?s time to start the real paint job. Use a small brush, +/- 4 mm width, and colour all the parts. This is the worst part of the job. The biggest problem is to stand in a good pose and do the painting. Don't under estimate this, if you're not careful, you will surely end up with a very sore back! So my advice to you is mind your back, and don?t paint for too long. Take a break once in a while, or better still: get somebody to help you do this part of the job!
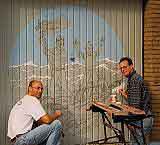 [Step 8 - Rob and Jack filling out the outlines on the garage door]
Step 9: Refresh the outlines
After all the colours have been put on, most of the outlines are not that nice anymore. Just take your permanent marker again and redraw all the outlines. Don?t be afraid to thicken them quite well. The width can be as thick as 4-5 mm. Afterwards, the image on the door will be enhanced by those thicker outlines.
Step 10: Finish your work with the transparent lacquer
To ensure your newly painted garage door stays beautiful for a long time, finish it with a layer of transparent lacquer. The lacquer protects your work from minor damages and above all, sunlight. After some years, when the lacquer becomes dull, just clean the door thoroughly, and give it a fresh coat of transparent lacquer. You won't have to repaint all the colours again... thank Goodness for that!
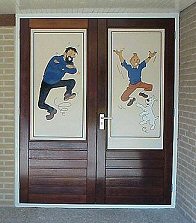
Update: Rob moved house in 2001, and he has since painted a new Tintin garage door [see picture below].